How to Test iOS Apps Seamlessly with TestFlight
Testing is an important part of the app development process. When building iOS (or Android) apps, it’s vital that multiple people to try the app on their own devices and test for bugs or usability issues.
For beta testing iOS apps, TestFlight is the tool you need. In this post we're going to explain all you need to know about TestFlight, how to use it, and a few more tips to guide you through beta testing your iOS app.
What is TestFlight?
TestFlight is Apple’s free tool to enable beta testing for iOS apps.
It works not just for iOS smartphone apps, but also for apps for iPadOS, macOS, tvOS, watchOS, and iMessage.
Through the TestFlight app, users can test beta builds of apps they've been invited to test. This allows testing of not-yet-published apps on an actual device, rather than in an emulator or simulated environment.
How to Use TestFlight
To use TestFlight, you'll need to have an App Store Connect account (aka an Apple Developer account).
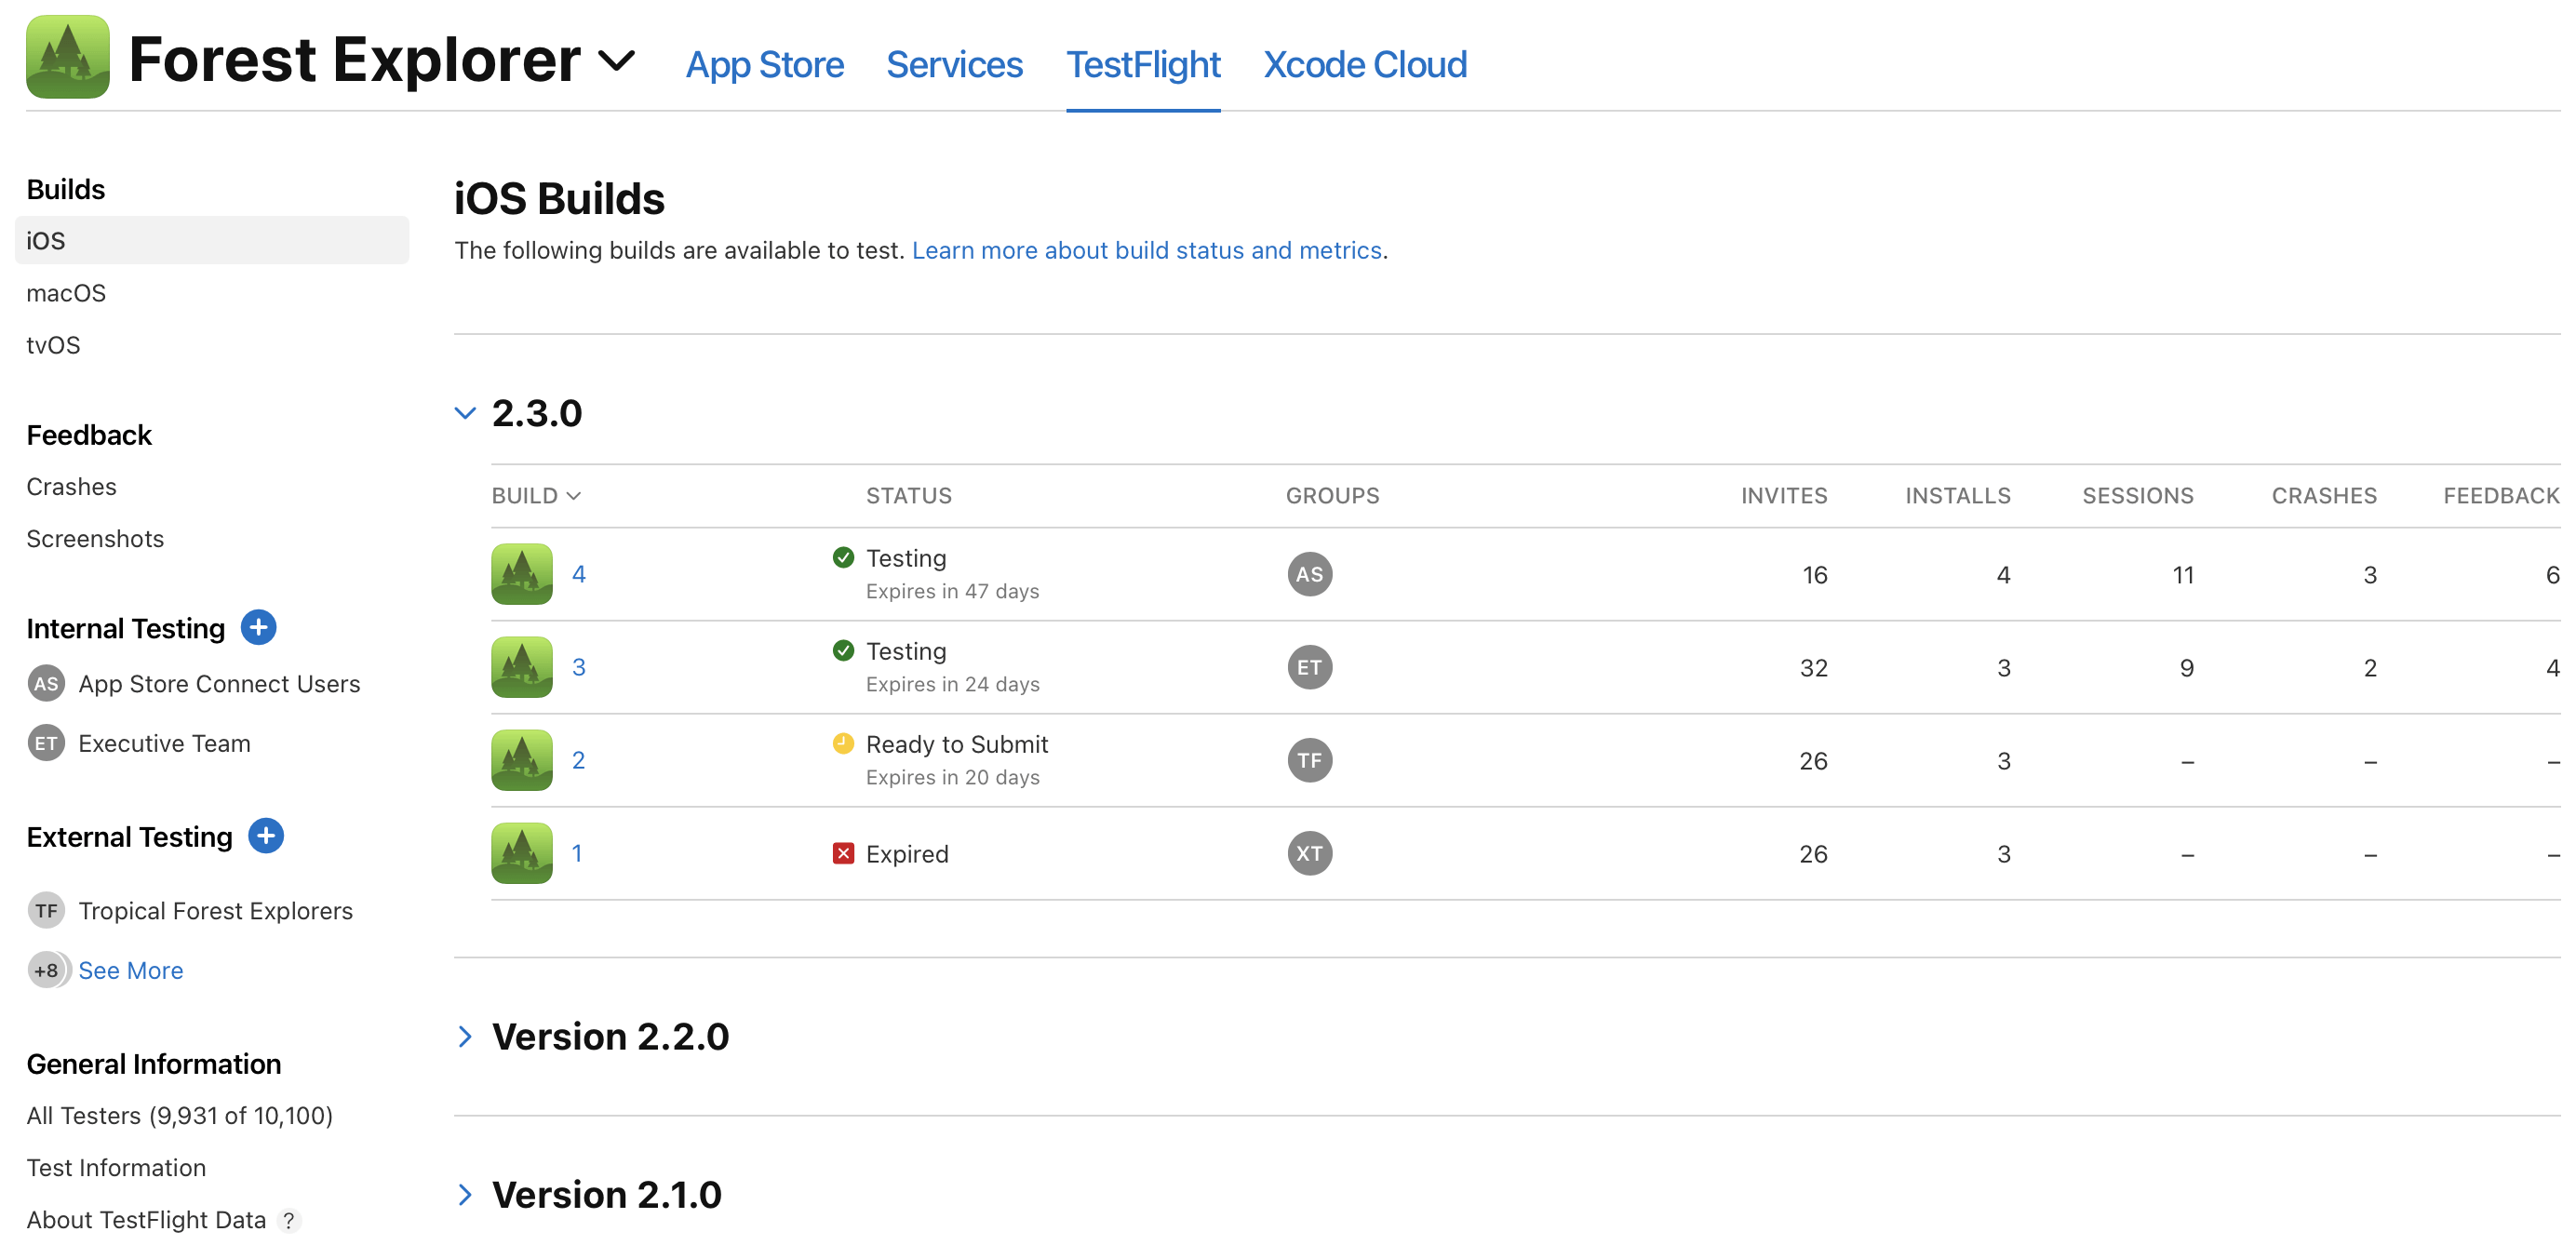
Inside App Store Connect, you'll navigate to the TestFlight tab, upload your build for the beta test, and invite users to test.
Test builds are available for 90 days. Within App Store Connect, you'll be able to view all your test builds, along with stats on:
- How many testers you've invited
- How many have installed it
- Total number of sessions
- Number of app crashes
- Number of pieces of feedback submitted

There are two kinds of testing you can enable: internal and external testing. Let's look at how to give internal and external testers access to your beta app.
Inviting Internal Testers
Internal testers are members of your App Store Connect account, who are authorized to test beta builds of your app.
You can have up to 100 internal testers. These must be added to your account, so internal testers are best suited for in-house testing teams, or adjacent roles such as app manager, marketing, sales etc who you want to have an input on the app before release.
Click here to learn how to add people to your App Store Connect Account.
Inviting External Testers
External testers do not need to be part of your App Store Connect account. You can invite external testers to your beta, they download the TestFlight app, and they'll provide feedback on your beta build.
(Before external testers test your app, you may have to submit it for a beta app review first).
You can have up to 10,000 external testers.
There are two ways to add external testers. You can add them to your test with their Apple ID email, or share a public link, which people can click on for access to the beta.
If you invite testers using a public link, you can limit access to fewer than 10,000 users, or turn off access to the public link at any time.
TestFlight Redeem Code
TestFlight may ask your external tester for a redeem code to access the test build.
This code will be sent along with the invitation email. This email will come with a link inside. Once the user clicks this link, they’ll see step-by-step instructions on how to get TestFlight and join the beta, along with the redeem code.
The TestFlight app will have a link on the top right of the screen saying “Redeem”, where users can enter the code and get access to your test build.
Each redeem code is unique, and can be used only once.
If your beta users didn’t receive a redeem code, have them:
- Check the spam box for the invitation email
- Open the email, click the link inside, and look for the TestFlight redeem code.
If this doesn’t work, try re-sending the invitation.
Viewing Feedback from Beta Testers
Beta testers can send feedback and submit screenshots directly through the TestFlight app.
You can access these, along with crash reports, in App Store Connect.
Testers may also send feedback to the email address assigned to the test.
Testing Your iOS App: How and Why
The app testing process is an important part of developing an app. Before you launch a new app, it's vital you test it thoroughly, particularly on a real device.
Why You Need to Test
You don't want to go live with a buggy, or sub-par app.
Doing this can result in poor reviews, which will make it difficult to get downloads even once you release an improved version.
Though your app doesn't need to be absolutely perfect for you to launch it and publish it on the App Store, it should at least come off as a complete, professional app.
On top of this, it's important to test on real devices, with users unfamiliar with the app.
The app might seem to work fine in an emulator or simulated environment. But you need to know that it will be stable and usable on an actual iOS device.
And while it may seem like everything works from your development team's testing, you need to know if any usability issues come up from fresh, unfamiliar users.
Remember, your team knows how the app is supposed to work. Someone who downloads it from the app store doesn't. If the app turns to out to be confusing and unintuitive, users will be quick to discard it and try another. You need this fresh perspective in the testing process, to ensure it makes sense to the end user.
How to Test Your iOS App Before Release
Here are some tips on effectively testing your app before you're happy to submit it for publishing on the Apple Store.
- Define test objectives: Before you start testing, clearly state your goals and objectives, including critical functionalities, use cases, and user scenarios.
- Test on real devices: Use emulators and simulators initially, but also test on real devices to accurately assess performance, user interface, and device-specific features.
- Test across various environments: Evaluate your app's functionality in different network conditions like Wi-Fi, 3G, 4G, and unstable connections to ensure optimal performance and smooth handling of network disruptions.
- Test usability and user experience: Conduct usability testing to ensure your app is intuitive and easy to use. Gather user feedback on design, interface, and overall satisfaction through user experience testing to identify areas for improvement and enhance engagement.
- Conduct functional and non-functional testing: Verify that each feature of your app functions correctly through functional testing. Additionally, perform non-functional testing to assess performance, security, compatibility, and accessibility for a robust and reliable app.
- Continuously iterate and retest: Testing is an iterative process. Retest your app after addressing identified issues and making updates to ensure new bugs were not introduced. Repeat this cycle until you are confident in the stability and readiness of your app for release.
Final Thoughts
Thorough testing is important if you want to launch a successful iOS app. Luckily, Apple provides a great testing tool for iOS developers, in TestFlight.
TestFlight is the way to go to run beta tests for your iPhone app. If you're building an Android app, there are some alternatives that do a similar thing.
Take the time to test your app, and get it right before launching, and you'll have a much better chance of getting traction once you actually land in the App Store.
FAQs
Convert your website into a mobile app


