In order to start sending push notifications from your WordPress Dashboard you will need to fill the "Push App ID" and "Secret Key" fields, under the "Push Notifications" tab, with your OneSignal keys.
The mentioned fields can be found under "Canvas > Configuration > Push Notifications" as you can see below:

These keys can be found in your OneSignal account, under the "Settings > Keys & Ids" area as you can see below:

Once you save your Push Notifications settings, a new section will be available, as you can see below:
The Push Notifications area will allow you to send manual notifications to your users and tracking information about previously sent notifications.

Automatic notifications for new posts
If you would like to send automatic notifications to your users when a new post is published on your website, you can enable this feature under "Canvas > Configuration > Push Notifications".
At the very bottom of the page you will find all the settings to configure notifications that will be automatically sent when a new post is published, as you can see here:

Notification tags
Tags will allow you and your users to segment the notifications they will receive.
In your app, if you have the "Alerts" tab enabled, users will be able to determine for which tags they will receive notifications, as you can see here:
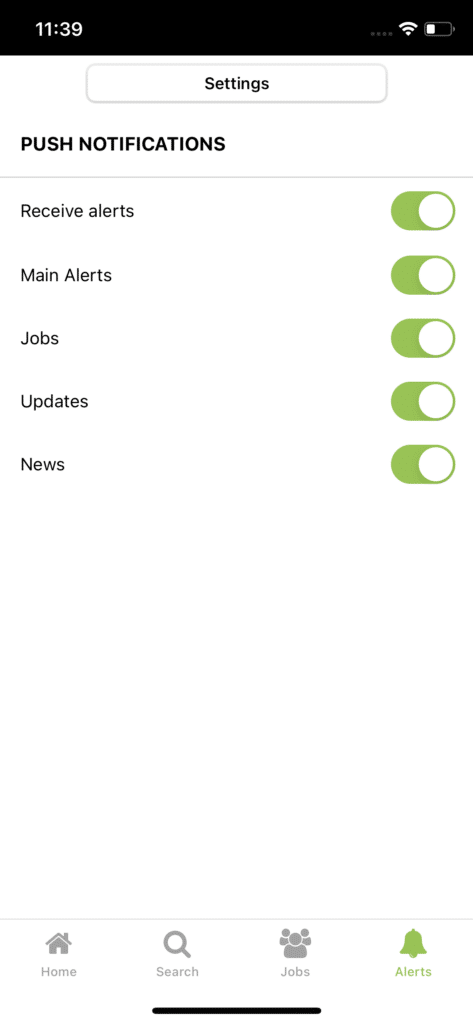
In this case Main Alerts, Jobs, Updates and News are all tags that the user can enable or disable so that when a notification is sent with one of these tags assigned to it, only users that have that tag enabled will receive it.
You can create or edit the tags directly from your Canvas Dashboard, keeping in mind that each tag will have two values assigned to it:
- Label: the text that will be visible to users in the app
- ID: the actual tag name that will be assigned to the user profile and used to send the notifications
To clarify, "Main Alerts" would be the label and "main-alerts" the ID of this tag.
The Canvas plugin gives you two options for tags, both explained below:
Category slugs as tags
When you attach a post to your notification, you can mark this option to include the "category slugs" of that post as tags in the notification. If a post is assigned to the "Featured News" category, the "featured-news" tag will be assigned to your notification and only users that have that tag enabled will receive the notification.
Keep in mind that you will need to manually create this specific tag in your "Canvas Dashboard".
Manual notification tags
If instead, you prefer to add tags to your notification manually you can use this option. You can simply add the IDs of your tags in the text field and those will be included in your notification.
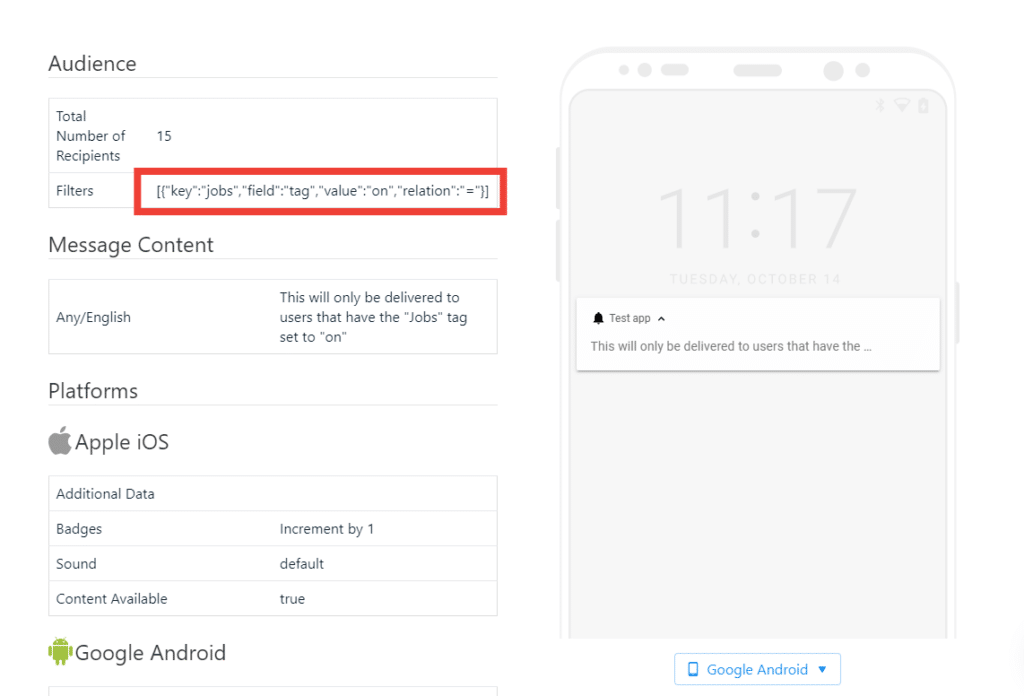
How tags work in OneSignal
Whenever a user enables or disables a specific tag, his profile in OneSignal will be updated with his selection, as you can see below:
The actual notification that you send, will include the necessary logic to ensure it only gets delivered to users that have the selected set of tags turned on: